Before you begin entering your data and searching for records in the Pontem Cemetery Data Manager, it is helpful to understand how the program is structured and how you get to the data you need. This article describes the basic structure of the application and the ways you can move around within the program.
The application shell is divided into three main areas:
- The Menu Bar located along the top of the application shell
- The Primary Task Panel located along the left side of the application shell
- The Workspace Panel is the large area located to the right of the Primary Task Panel
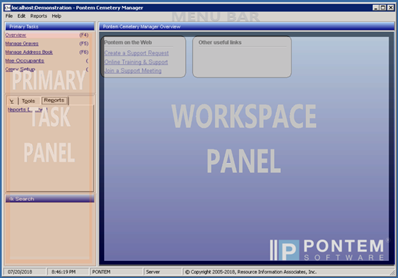
PRIMARY TASK PANEL
The Primary Task Panel is divided into three sections:
- Primary Task List for opening a list of records in the Workspace
- Tabs: Views, Tools, and Reports for navigating to data details specific to the Primary Task
- Quick Search for filtering the data records displayed in the Workspace
Primary Tasks List
The Primary Tasks List is the main hub for displaying data in a Workspace. To begin entering, changing, or looking up data, you start by opening the Workspace best suited for the tasks you are needing to accomplish. The list is always visible in the top section of the Primary Task Panel.
To display a specific Workspace, simply click on one of the items in the Primary Task List.
Overview
This is your program landing page. This task area is your hub for quick links to:
- Create a Support Request
- Launch the Pontem Online Training and Support website
- Join a Support Meeting with a Pontem staff member.
- You can also setup your own customized links for this page.
Manage Graves
This is the Workspace for your property records and associated people. It provides navigation to Occupant records and Owner & Reserved records.
Feature Highlights for this Workspace include:
- Advanced filter and search capabilities on fields related to the property, as well as fields for associated people and occupant records.
- Hyperlinks for people and occupants to their related workspace.
- Ability to attach and view images and documents related to the property
Manage Address Book
This is the location for your people/contact records. People records may or may not be associated with property records. People records are automatically created for property owners and reserved contacts, as well as for interested parties and alternate contacts.
Feature Highlights for this Workspace include:
- Easily navigate from a People record to associated property or occupant record
- Advanced filter and search capabilities more focused on People and their associated records.
Manage Occupants
This is the Workspace for occupant (burial) records. Every occupant record is associated with a property record and you can navigate to the property record from an occupant record. Occupant records may or may not be associated with People records in the Address Book.
Feature Highlights for this Workspace include:
- If an interested party has been related to the occupant record, then there will be a People record you can navigate to from the occupant record.
- Advanced searching capabilities here are very robust as related to information contained in the occupant records.
Cemetery Setup
This is the Workspace for your cemetery definition records. This is where you will define your cemeteries and configure their respective property addressing. You will have one record for each cemetery you manage or each area within a single cemetery that has a unique way of assigning property addresses.
Feature Highlights for this Workspace include:
- This Workspace can be restricted to specific users who have been assigned to a security group that allows management of cemetery records.
Tabs: View|Tools|Reports
This section of the Primary Task Panel is for navigating and managing data specific to the selected Primary Task Workspace.
View Tab
This is a list of pages available for viewing details for records displayed in the Workspace. Clicking an item in the View list will display the page for the selected record. The default view when first opening a record is the General Page.
Tools Tab
This is a list of tools available for customizing drop-down lists and managing records relative to the Workspace.
Feature Highlights for Tools include:
- Each tool that begins with the word “Manage” is a tool for customizing drop-down menus.
- Mass Data Entry (mass creation of property records)
- Mass Data Edit (related to limited fields found on property records)
- Change Location (of occupants)
Reports Tab
This is a list of Reports that have been saved as Workspace specific quick launch bookmarks. Click here for instructions to create these report bookmarks.
Quick Search
This section of the Primary Task panel is for broadly filtering the records in the Workspace, to assist in searching for records matching specific criteria. (Click here for more details)
WORKSPACE PANEL
Records List Views
Most of the Primary Task Workspaces initially open a Records List View related to the selected task:
- Manage Graves shows a list of your property records.
- Manage Address Book shows a list of contact records.
- Manage Occupants shows a list of occupant (burial) records.
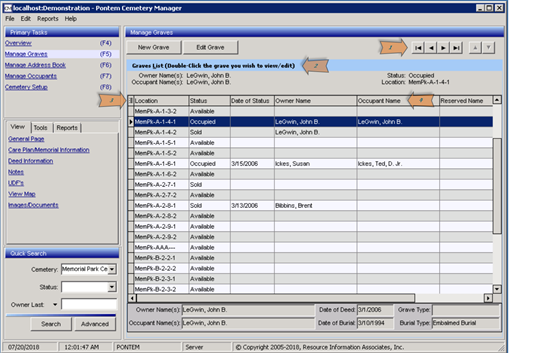
- Use the record Navigation Arrows to move through the records in the list, one at a time or page-by-page. There are 60 records on a single page.
- Click on the blue Toggle Bar to switch your view between Records List and selected Record Detail
- Click on this little box to open a list of optional columns that can be displayed or hidden in the list view. Customized list views are user specific.
- Click on any column header to sort the list view by the data in that column. The first click will sort the records in alphabetical-ascending order. The second click will reverse the sort. If you leave the primary task area and then return to it, the list view will default the sort to the first column, alphabetical-ascending order.
Record Detail View
The Record Detail View shows data related to one record from the List View. A Detail View can be displayed by:
- Selecting the Toggle Bar on the List View
- Selecting one of the items listed on the View Tab in the Primary Task Panel.
Data displayed in a detail view as a hyperlink can be used to navigate to the data details in its related Workspace.
Here is a list of the data with hyperlinks in the Cemetery Data Manager:
Workspace Data Hyperlink Navigates to This Workspace, View
Manage Graves Owner Name Manage Address Book, Contact Detail View
Occupant Name Manage Occupants, Occupant Detail View
Reserved Name Manage Address Book, Contact Detail View
Manage Address Book Property Record Manage Graves, Property Record Detail View
Occupant Name Manage Occupants, Occupant Detail View
Alternate Name Manage Address Book, Contact Detail View
Manage Occupants Property Record Manage Graves, Property Record Detail View
Interested Party Manage Address Book, Contact Detail View
0 Comments