- General Cemetery Information
- Setting Cemetery-Specific Preferences
- Defining an Image Directory
- Defining Grave Addressing Labels
- Adding Standard Maps
- Setting up GIS Maps
Pontem allows you to manage single or multiple cemeteries within one easy-to-search database. Pontem recommends adopting a single naming schematic for your property addresses if possible. However, it may be necessary to create multiple "cemetery" entities in the event of any of the following:
- More than one cemetery is managed
- Various types of cemeteries are managed (i.e., mausoleums or columbaria) where a common addressing schematic is not possible
- Various types of location descriptions fall within one cemetery (e.g., Section, Lot, Grave for one portion of the cemetery; Block, Row, Grave for another portion of the cemetery)
The address labeling methods in Cemetery Setup will become the foundation for your data, so it is important to take a variety of factors into consideration - especially are already using GIS mapping or if you are planning a future GIS mapping project.
Please refer to the article ”Grave Addressing Best Practices” to understand what things you need to consider as you define the setup of your cemetery. We also encourage you to contact our helpdesk if you have grave addressing questions. We can usually give a recommendation.
Entering General Information About Your Cemetery:
- Click on the Cemetery Setup primary task.
- Click the New Cemetery button.
- Enter the name, address, and contact information for your cemetery in the top portion of the New Cemetery record.
- If desired, enter the legal description and/or any general notes about the cemetery you would like to record.
NOTE: ‘Employee Contact’ and ‘Employee Position’ are drop-down menus. If you want to list an employee as the main contact for the cemetery, you will need to add the employee to the software first.
The Employee Position field is found inside the employee contact ‘Manage’ tool. Please refer to the “How to Customize your Drop-Down Menus “article if you need instructions.
SETTING CEMETERY-LEVEL PREFERENCES
Each cemetery entity created allows some level of control as to what can be done with that cemetery’s records. For example, you may want to allow the records to be added, but never deleted. Or, you may want to eliminate the ability for any user to edit the grave location address after it has been defined.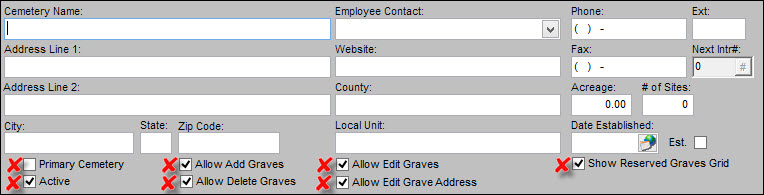
For each Cemetery-level preference (referenced by a red X on the above image) check the box:
- Primary Cemetery—If this cemetery is your only or most active cemetery.
- Active—If you want to specify sales and/or burials still occur in this cemetery.
- Allow Add Graves—To allow staff members or record management volunteers to add new grave records in Pontem for this cemetery. Use caution for this setting if you have GIS mapping; contact our Support Staff if you would like further information about the effects of this setting in association with GIS mapping.
- Allow Delete Graves—To allow staff members or record management volunteers to delete grave records for this cemetery.
- Allow Edit Graves—To allow staff members or record management volunteers to edit grave records for this cemetery.
- Allow Edit Grave Address—To allow staff members or record management volunteers to edit the grave address in a record for this cemetery
- Show Reserved Graves Grid—To record Reserved contact information on grave records (information for the person intended to be interred in the grave space when they become deceased).
DEFINING AN IMAGE DIRECTORY
Pontem’s integrated Image and Document Manager allows you to attach scanned images and documents to grave records. They may pertain to the grave, the grave owner(s), the grave occupant(s), and/or the grave reserved contact(s).
You may associate an unlimited number of attachments to records. For this reason, the quantity of hard-drive space needed for images and documents may become very large. Given that, the attached files are not stored within the database file. Rather, we recommend you use a separate folder that may be stored on your computer’s local hard drive or moved to an external storage device.
If you do not specify a location for your images to be saved, the default image directory is used. If you would like to change the location of this storage, then click on the Browse button in the ‘Image Directory’ area of a Cemetery Setup record and set the path you would like.
If your Pontem software is installed on a server or utilizing a Peer-to-Peer connection to allow many users access from multiple computers, then the image path must be a UNC path to the location of the folder on the network. Please contact our Support Help Desk if you need further assistance on this topic.![]()
Caution: If you change the default location for your images, they will no longer be stored near the database file in the Pontem directory path. Should it be necessary to move your Pontem software from one computer to another or restore your program because of catastrophic loss, it may be more difficult to locate and restore your images.
Defining Grave Addressing Labels:
The address labeling methods in Cemetery Setup will become the foundation for your data, so it is important to take a variety of factors into consideration - especially are already using GIS mapping or if you are planning a future GIS mapping project.
Please refer to the article ”Grave Addressing Best Practices” to understand what things you need to consider as you define the setup of your cemetery. We also encourage you to contact our helpdesk if you have grave addressing questions. We can usually give a recommendation.
- Enter the abbreviation for the Cemetery name. Typically, this is the first letter of each word. For example, if the cemetery name is Memorial Park Cemetery, then the abbreviation would be MPC. This abbreviation displays wherever it is not practical to display the cemetery’s full name such as on the screen, maps, or certain reports.
- Enter the label names for the addressing method. These are the words use to describe where a grave space is found in the cemetery. Begin in Label 2 with the largest building block in your cemetery.
![]()
For example, if your cemetery is structured with large sections that are broken down into lots and spaces, then Label 2 would be SECTION, Label 3 would be LOT, and Label 4 would be SPACE.
ASSOCIATING STANDARD MAP IMAGES
If you purchased Pontem’s integrated Standard Mapping Module to enhance the capability of your Pontem Cemetery Data Manager software, you will need electronic images of your map(s). If your software is NOT licensed for standard mapping, the related fields have been hidden from the Cemetery Setup workspace, and this section does not apply to you.
Cemetery Size and Shape - One Map or Many?
Pontem's software allows you to have multiple maps for a single cemetery. However, it is most ideal to have a single map. This is a good option if your cemetery is small (less than eight acres) because you can fit eight acres on one sheet of paper and it still is readable.
If your map exceeds eight acres, you may want to consider splitting it into smaller maps or even section maps. The choice is up to you.
We are happy to talk through options and provide our opinion related to your specific situation. Just give us a call toll-free at 888.237-8531. You may also refer to the article “Obtaining and Preparing Map Images for Use with Pontem’s Standard Mapping Option.”
- Begin by placing copies of your map image(s) into the appropriate directory The standard default directory path to store your map images is: C:\ProgramData\pontem\firebird\cem\maps.
NOTE: If your software is installed on a network and you do not wish to use the default directory, please call the Pontem Help Desk to discuss an alternate location for your maps.
- After storing your map images in the correct directory path location, take these steps to attach them to your cemetery record(s) in Cemetery Setup:
- Click on Cemetery Setup.
- Click on Cemetery Maps on the ‘View’ tab.
- Click Edit Cemetery near the top on the program window.
- Click the yellow ‘Browse’ folder icon and navigate to your map image (Be sure the file type field indicates whether your image is a .jpg or .png image.)

- Select your map image file and click Open.
- Click Save.
NOTE: if you have multiple map images, repeat the above steps to attach all of them.
ASSOCIATING YOUR GIS MAP DATABASE
If you purchased Pontem’s integrated GIS Mapping module to enhance the capability of your Pontem Cemetery Data Manager software, you will work with a Pontem service team member to install and associate your maps. Some of the setup is accessed through Cemetery Setup|View Tab|ESRI Maps.
0 Comments